Wall cladding panels are a fantastic way to elevate the appearance of your outdoor or indoor walls, offering both protection and style. Whether you’re upgrading a garden feature wall, refreshing your fence, or adding texture to an indoor space, proper installation is key to achieving a clean, long-lasting result.
Here’s a step-by-step guide on how to install our 2.9m wall cladding panels with ease.
🛠️ Tools & Materials You’ll Need:
-
Wall cladding panels (e.g. 2.9m long from The Garden of Paradise)
-
Timber battens or furring strips (if installing over uneven surfaces)
-
Galvanised screws or cladding nails
-
Drill or screwdriver
-
Spirit level
-
Measuring tape
-
Saw (for trimming panels)
-
Safety gear (gloves, goggles)
🔧 Installation Steps:
Step 1: Prepare the Wall Surface
Ensure your wall is clean, dry, and structurally sound. If the surface is uneven (e.g. brick, concrete, or old fencing), install vertical or horizontal timber battens at regular intervals (typically 400–600mm apart) to provide a flat fixing surface.
Step 2: Measure & Plan Your Layout
Measure your wall area and plan the number of panels required. It’s best to start installation from the bottom and work upwards, ensuring the first row is level.
Tip: Use a spirit level and mark a straight reference line before starting.
Step 3: Cut Panels to Fit (if needed)
Use a circular saw or hand saw to cut panels to the required length. Always wear safety gear when cutting.
Step 4: Fix the First Panel
Place the first panel at the bottom of the wall, aligning it with your level guide. Fix it securely using screws or nails through the pre-drilled points or edge grooves (depending on panel design).
Step 5: Continue Panel Installation
Stack or overlap the next panel above, ensuring a tight and clean joint. Continue fixing each panel to the wall or battens. Use spacers if you want a shadow gap effect between panels.
Optional: Apply silicone sealant between joints for extra weather resistance in outdoor areas.
Step 6: Trim Edges & Finish
Once all panels are installed, trim the final pieces to fit around edges, power points, or corners. Add corner trims or edge trims if required for a polished finish.
🧱 Can I Install Wall Cladding Myself?
Yes! Our cladding panels are designed for DIY-friendly installation, and most homeowners or landscapers with basic tools can complete the job in a day or two depending on the wall size.
However, for larger or more complex projects, hiring a professional is always an option.
✅ Why Use Wall Cladding?
-
Enhances visual appeal instantly
-
Covers unsightly walls or fence panels
-
Adds weather protection in outdoor areas
-
Low maintenance & long-lasting
-
Great for both residential and commercial spaces
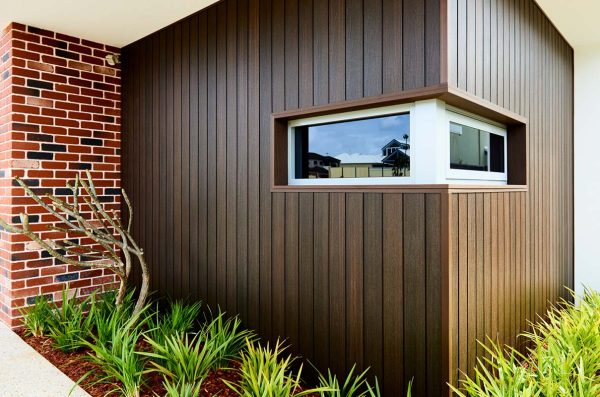
At The Garden of Paradise, we supply high-quality wall cladding panels in Black-Grey and Coffee Brown, each measuring 2.9m long – perfect for both indoor and outdoor applications.
📍Visit us in-store or contact our team to learn more and explore our full range.